This is one of the new error message that I had faced yesterday. I am very enthusiast in the working of Android apps and decided to learn some basic knowledge about android apps. After a research, many friends suggested me to try Android Studio because as a beginner, I could learn it easily instead of using Eclipse.
I had a little knowledge about this android developing tool and I directly download the version from official page. But after installation, it showed many other tools like JDK, packages, SDK tools etc need to install. The first tool need to be installed is the JDK. I go to some websites and download the 64 bit JDK and installed it on my PC.
The error didn’t washed out even though I installed the correct version of the JDK. Then I completely read through the error message. It shows that, If you already installed the JDK, then we need to define a JAVA_HOME Variable in the environment variables. As a beginner, I didn’t understood what they are saying, but after passing through some video tutorials, I figured out what to do. At last, was able to run android studio without any issues. My findings are mentioned below with relevant screenshots. Just follow those steps and run Android Studio without any other issues.

How to solve “No jvm installation found” on Android Studio?
[xyz-ihs snippet=”middle”]
#1 Installing JDK
The first step to resolve this issue is that, you should manually install the Java Development Toolkit (JDK) in order to make the Android studio working properly. JDK is one basic component that is required by the Android Studio as well as Eclipse.
You may wonder why this JDK is so important in java related applications. Basically JDK contains all the files that are required to run the java applications. Java Compiler, App Launcher etc are some features of JDK. It is mainly focused on the java application development.
So if you are going to deal with Java Program, Eclipse, Android Studio etc, you need to install JDK first.
#2 Check the 32/64 bit version
Suppose that you are running a 64 bit machine. Most of the 32 bit applications will be runnable on a 64 bit system. JDK is an example. If you are using a 64 bit system and you had installed an 32 bit JDK, just override it with a 64 bit version.
Just look your C drive of your 64 bit PC. There will be two program files folder. One with name “Program Files” and another with name “Program files (x86)”. If jdk is automatically installed inside “Program files (x86)”, it means that you are using a 32 bit jdk. Download and install the 64 bit jdk from here. Then continue the installation.
Download JDK 64 bit.
#3 If Jdk is installed, then set the environment variable.
Many people using windows 8 and windows 8.1 receive the same issue after they had installed the JDK correctly. I had also faced the same issue. If you are getting the “No jvm installation found” again after installing JDK, you can bypass this by setting environmental variable for JAVA_HOME. Here is the detailed guide for setting the environment variable for JAVA_HOME.
Step 1:- Right Click on My Computer/This PC.

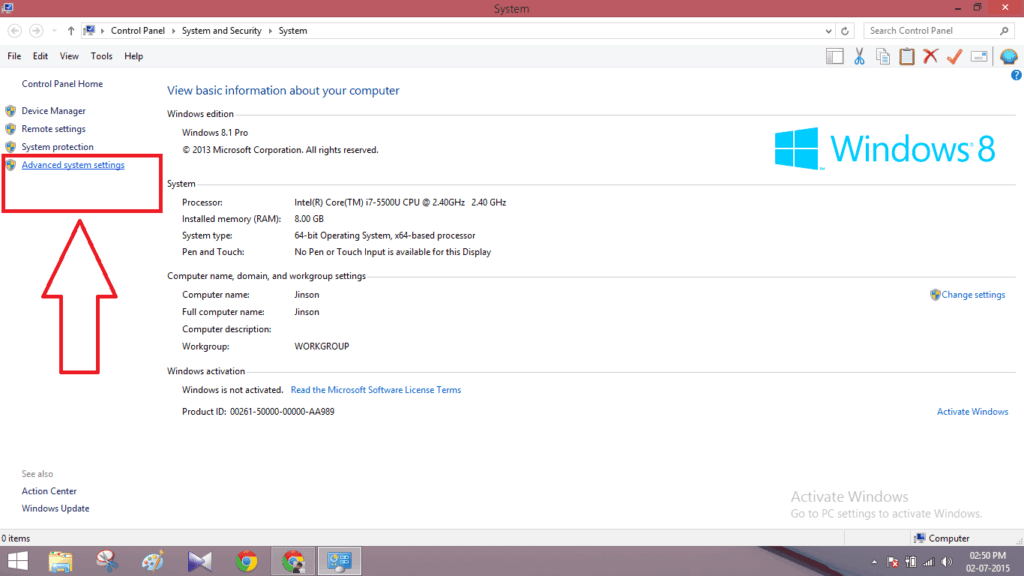
Step 2:- Select the “Advanced System Properties“.

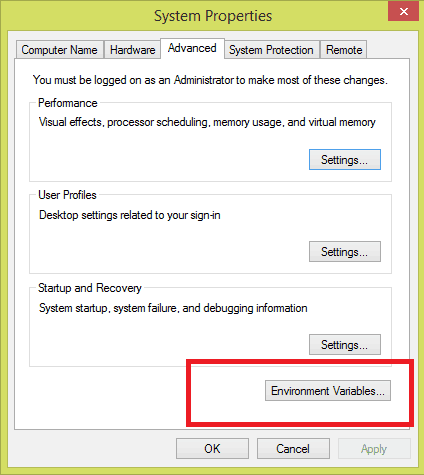
Step 3:- There you can see an “Environment Variable” button. Click on it.

Step 4:-Now you will get a small pop up windows asking to set the environment variables. In the first column, just right to Variable name, give the values as “JAVA_HOME“. Now right to the variable value, give the file path to the folder where JDK is installed. Usually it will be “C:\Program Files\Java\jdk1.8.0_45“.

Step 5:- Press OK button to finish the work.
Now you are finished from your side. Just open the android studio again. There will be no further issues. Hope this tutorial helped you. Waiting for your response.


